Saturday, January 30, 2010

Round Orange Puppet

This is another blank character I whipped up.
I call it "the orange one" ...or just "fatty."


It took some special planning, most notably in the stomach.


Tuesday, January 19, 2010

Puppet Rack & Photos

Now they have a place where I can display them...  and they're out of the way.


I didn't realize until I put all this up that I have as many blank characters as finished characters.  sweet.


Floyd, now with 100% more tongue.
Staniel... posing, apparently.
Gertie is too close.
Erma wants you off her lawn. 
Staniel is up to something.


Sunday, January 17, 2010

Chef Character Ideas

I've had this idea brewing for a while now.

Two chef characters with some sort of cooking show.  One would be the old, wise, master chef, and the other would be a bumbling apprentice that despite their enthusiasm, can't seem to get things right.
After thinking it over for a bit, I realized that it would play out much like a combination between a Muppet-Labs and Swedish Chef sketch.

At first I was a bit disappointed in my apparent lack of originality.  The more I thought about it though, I thought it sounded like a whole lot of fun anyway.


Thinking about it now, I think it might be fun to work in a little bit of Mythbusters, as well, since Adam and Jamie's personalities fit so well into the dynamic of these characters.

Monday, January 11, 2010

Puppet Building Process

These photos are quite old, and don't really reflect how I build puppets now, but they show the basic process I followed when I started building puppets.

I thought it may be helpful for anyone out there getting started building puppets of their own.


Building the head
This puppet's head was originally a "failed attempt" at building something else.  It didn't turn out like I'd pictured it, but I was able to recycle it as something else.

Lesson 1:  Mistakes aren't bad.  If something doesn't come out quite right, you've just learned something.  Plus, in this case, you are left with an extra puppet head.

The mouth-plate:
One of the most important features of a puppet, it's mouth plate.  You don't need to start with the mouth, but I did.  Doing so makes sure that the characters mouth fits your hand, and grows comfortably from there.
This is just one way to do it, however.  There's no wrong way to build a puppet.

I used craft foam for the mouth itself, and the hinge, layering it to make it sturdy, yet flexible.


I added a foam cuffs to the top and bottom to hold the puppeteer's fingers in place.


(This could have made an interesting character if I had stopped here.)


The skull:

I found a basic sphere pattern online, made up of wedges.


I fiddled with it and modified it a bit, and used this to make the top of the head.


Then, I put the skull-cap, and mouth together.


Unfortunately, I didn't document the rest of the head's build after this point, since it happened much later.
Not pictured:
Putting fabric "skin" onto the head
Making and attaching a neck-sleeve

Luckily though, there isn't a whole lot to say about those steps.  I figured them out by trial and error, and you can get a pretty good idea of how it works from the following pictures.


The Body:


The body pattern was made with a similar wedge-based idea as the head was.  However, I altered it quite a bit.
That process is a bit too tedious and technical to address here.
A simplified way to approach it would be to start with a cylinder, then adding and subtracting wedge-shaped "darts" until it is shaped right.


Hands & Arms


I decided to make both live-hand and rod-hand arms for this puppet (to be able to have either, as needed).
The short version of this is to draw a hand shape, and sew it.  It's not all that complicated.


Live hands must be big enough to work as gloves.  The puppet's arm has an extra sleeve between the wrist and elbow, where the puppeteer's hand enters.


Finishing up

It's on a golf-club.  But that's not important.
The puppet is not on my head, but it's fun to pretend.

Then I put skin on everything.  I don't have these steps documented, but if I did, it would be a lot of similar not-very-interesting-or-helpful pictures.  Also, at the time of building this one, it was a lot of trial-and-error on my part.


I designed this puppet so that its arms, head and body would be interchangeable (I made two sets of arms, and had planned on making different heads and bodies, too).  This would allow for a great deal of combinations of shapes and characters from just one puppet.  (I wanted to have a versatile "extra" that could play a mailman, someone's aunt, secret agent, livestock, etc.  as the need arose.)


Old commercial and out-dated custom-info

ATTENTION:  
THIS PAGE IS OUT OF DATE.  IT HAS BEEN REPLACED BY THE "CUSTOM PUPPET INFORMATION" PAGE ABOVE.
If you are viewing this post to find out about custom puppets, please go here or click the "Custom Puppet Info" button above.


Take a look at our commercial, to get a brief overview, as well as some contact info:


Puppet Bases:

the shape and type of the puppet's head and body.

Sock-style puppet-

--- This comes with:
-a fully customizable face (eyes, eyebrows and nose's size shapes and positions, all to your specifications)
-hair (if desired, made from, yarn, felt, or feathers)(more complicated hairstyles will bring a higher price)
-Simple-style hands and 1 basic-style rod(both explained further down).
sock style examples:


Round, person style puppet-

-includes:
face
hair
simple-style arms/hands and 1 rod.
examples of this style here:


Larger, more complex character- 

This one is a bit more open-ended, a full-out customized puppet.  You can design and request every last detail.  Hence the price difference.
For this one, you can request specific shapes for the character, costume, and style of controls.


If commissioning a fully custom puppet, a design sketch would be greatly appreciated.
However, if you can not provide one, give as detailed a description as possible to me, and I'll do the design sketch for you.
Once I get your okay on the sketch, I'll begin building to it.


Sack-style & monster puppet-

This style also may have customized shapes, number of fingers, length of arms etc.
(though, you may request the "standard" which is basically what the example drawing is)
Hands are controlled by putting your arm into the puppet's arm. This type is able to manipulate props and objects.
This style may have some limitations, depending on what fur-fabrics are available at the time of order. (Though, it doesn't necessarily need to be fur at all.  A non-fur puppet of this kind would be a considerable amount cheaper.)
The head may be any shape you like, it isn't limited to this round one.
You only get one option of hand type, obviously.
examples:

Similar to Rowlf or Cookie Monster.

Custom Costuming-
This can be pretty much anything you'd like it to be.
However, if the larger and more intricate it is, the more I'll ask for it.
If you'd like a simple t-shirt, or even a real shirt if the character is big enough, price can be negotiated down.

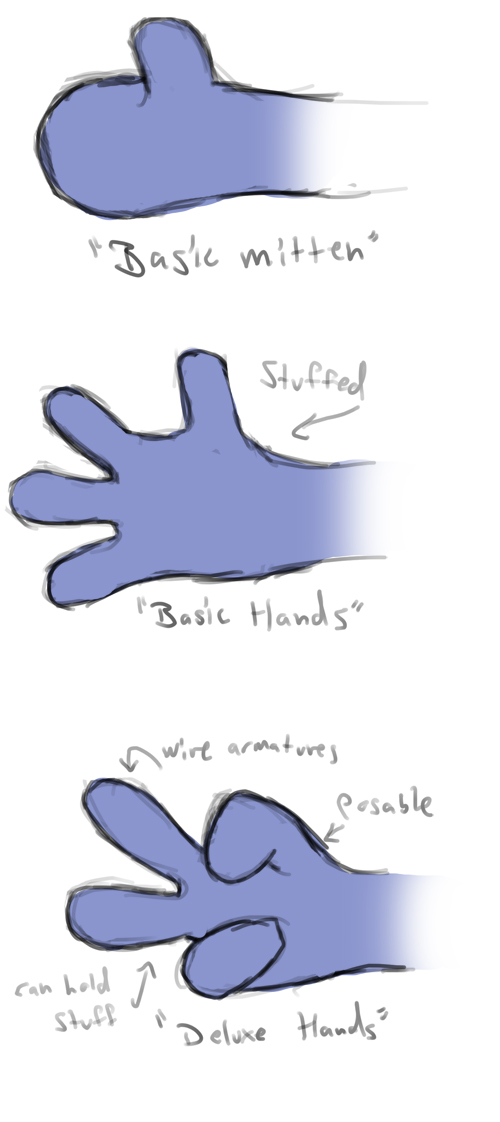
Hands:
Different styles of hands balance between affordability and awesomeness.


Mitten-hands- This style comes free with the base price of a puppet.
Basic Hands-  -This style has with 4 fingers, which are stuffed, and not posable.
Deluxe hands- -Comes with 4 fingers, and has an armature inside, which allows the hand to be posed.


Live hands--

-This type of hand generally works better with a larger character, but if you like, the option is available with smaller puppets.  (I personally like the 'small character, big hands' look)
-This is similar to the "sack-style" puppet, where the puppet's hand is a glove, and you control it by putting your hand inside.
-Since having two live-hands on a puppet would require another person to operate it, you may opt to have only 1, and have the other hand be stuffed.
-anything you'd like to request, just ask.


Rods:

How the rods attach to the puppet's hands.  With the base price, you get 1 free rod, and the "basic" option. 


Basic detachable configuration- 1 free rod with base price
-The arm is sealed, like a stuffed animal's arm.
-the rod is attached to the hand with an elastic band (instructions will be included which explain the easiest and best way to do this)
~pros: cheapest, simplest option that allows for detachable rods
~cons: you have a visible elastic band around the puppet's arm.

Attached rod-
-The rod is attached into the hand/arm of the puppet, it IS NOT removable.
-If you want another to control the other arm, it will cost another $3.
~pros: the firm attachment to the hand allows for very precise control, you will never lose the rod, looks very nice.
~cons: you can't remove the rods from the hands.

Deluxe detachable rod-
-a hidden pocket in the bottom of the hand allows for a rod to be inserted and removed.
-If you would like another to control the other hand, it will cost another $5
~pros: The best of both worlds.  The hand looks good with and without the rod in it
~cons: costs more, due to the amount of work needed to make it.


If you want to mix-and-match rod styles, you could, for example, put a deluxe rod option on one hand, and a basic on the right.  Just ask.


Other Options:


Legs, extra arms, different hands, fur, or any other custom options may be requested.

If any request requires me to make a vastly different pattern, I'll inform you of a price difference.
This would include something like, a very involved nose, or head shape, a large chin or something like that.
Totally do-able, but it would take some special consideration and prep-work to get done.

Color:

You may choose whatever color you like. The options for the "skin" tone are pretty much limitless. Pretty much any color you can imagine.


Again, don't hesitate to ask if an option is available. If you have a price limit, I can make some changes to the design to accommodate.

If you don't, you can request pretty much anything. I aim to please, and am capable of customizing anything you like.

What started all this puppet business, anyway?

Years ago (high school), I had the idea to create a video series with some puppet characters.
I liked the idea, and always wanted to do something with puppets.

There were a few impediments preventing me from doing this, though.
First and foremost:  I didn't have any puppets.  I had no idea where I could find one that didn't look like a toy, and I didn't know the first thing about making them myself.

The short version of the story:  I still haven't gotten to that video series, but I managed to teach myself the ins-and-outs of puppet building.

As I was learning how to put puppet characters together, I ended up making a few characters for friends and family.  One thing lead to another, and I began offering my services selling custom puppets, which is why you're seeing this webpage right now.


I built a cast, then life hit me hard (college will do that), and I wasn't able to pursue video-making much.  I did make the occasional test here and there, though.

Such as this "gem" before all the characters were finished:


I started on a character that was perhaps a bit more ambitious than I should have attempted as a beginner.


I worked with materials that I could find, and made sure to save my patterns, in case I stumbled backwards into any "happy accidents" that I wouldn't be able to replicate later.


All things considered, this character turned out pretty good for a first attempt.  I've considered going back and giving it real eyes and teeth.


You can see it here, with a few of my other, very primitive early puppets:


I had even made plans for some more elaborate characters:

And eventually, I amassed enough of a "cast" to put some sort of videos together.  


But, like I said, life got in the way of that goal.  School demands attention, you know.


Around this time, I also made an attempt to sell some puppets, too, since I'd just learned a pretty interesting skill.
For a hobby-level, I did pretty well with that.


Which, eventually resulted in the webpage you are now reading, and the armfuls of puppets that we've built for people.
And, if you're interested, you can have a custom puppet from us.
Have a look at our custom information, and order form here.